Hi,
I’m sure every XenServer user remembers very well that once upon a time when Vyatta was released it came along with a preconfigured XenServer template which was very convenient and quick way to get rolling. Then Vyatta discountinued image preparation for free edition but actually it’s quite simple to prepare this image yourself and if you tend to have a highly customized environment you may even include some custom settings in the template (like NTP servers, users and passwords etc. but also entire config branches for many services) so that you don’t have to configure it manually on each new VM.
I created this manual a while ago and it was even posted on vyatta.org but since it’s no longer available, please find this revised guide below. It’s tested with VyOS 1.0.4 and XenServer 6.2.
-
Start with downloading the ISO file, be sure to download the “virt” version made for virtual environments.
-
Create a new VM in XenServer using “Other install media” template (scroll down the list). Select the VyOS ISO as the installation source. It’s enough to assign 512 MB of RAM and 1 vCPU. This is only for the template VM and your actual VM that will be later created based on this template may have other settings. Therefore you also don’t need to assign any interfaces. 4 GB disk is enough for the storage.
-
Start the VM and login as vyos/vyos and process with the image installation. It’s important to answer “Yes” when setup asks whether to prepare the config files for PV conversion.
install image-
Reboot the VM and make sure it boots from the disk (you can unmount the ISO while VM is shut down).
-
Login again and mount XenTools ISO:
sudo su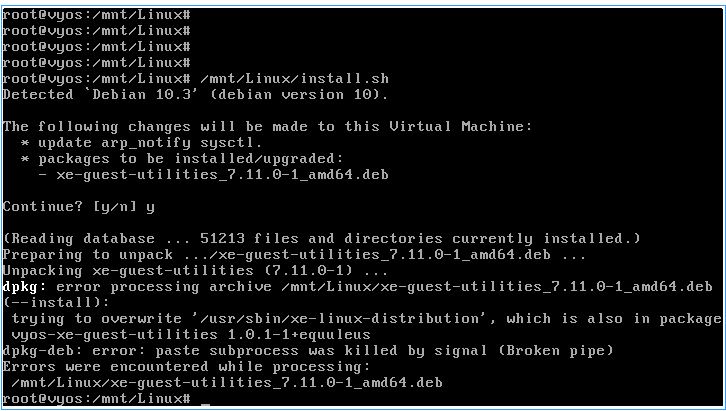
mount /dev/cdrom /mnt- Now install XenTools:
/mnt/Linux/install.sh- Power off the VM (do not reboot it):
poweroff-
Now go to XenServer host console (either via XenCenter or just ssh to the host). We will now convert the VM from HVM to PV.
-
Find the UUID of the template VM and change its boot policy:
[root@XEN05 ~]# xe vm-list name-label=VyOS_Template
uuid ( RO)           : 6cb4d109-5499-d112-c777-d2a2c8369b39
     name-label ( RW): VYOS_Template
    power-state ( RO): halted

[root@XEN05 ~]# xe vm-param-set uuid=6cb4d109-5499-d112-c777-d2a2c8369b39 HVM-boot-policy=""
[root@XEN05 ~]# xe vm-param-set uuid=6cb4d109-5499-d112-c777-d2a2c8369b39 PV-bootloader=pygrub
[root@XEN05 ~]# xe vm-param-set uuid=6cb4d109-5499-d112-c777-d2a2c8369b39 PV-args="console=hvc0 xencons=hvc"- Now find the UUID of the bootable disk’s VBD - it’s important to grab the identifier of the VBD and not the VDI! Set the VBD as bootable.
[root@XEN05 ~]# xe vm-disk-list uuid=6cb4d109-5499-d112-c777-d2a2c8369b39
Disk 0 VBD:
uuid ( RO)             : 15ef5e96-9682-2db7-df6e-25f3c1acab80
    vm-name-label ( RO): VYOS_Template
       userdevice ( RW): 0


Disk 0 VDI:
uuid ( RO)             : aeaf3bfa-b396-4e9e-bb33-3b6770a1897a
       name-label ( RW): VYOS_Template
    sr-name-label ( RO): Local B SR
     virtual-size ( RO): 4294967296


[root@XEN05 ~]# xe vbd-param-set uuid=15ef5e96-9682-2db7-df6e-25f3c1acab80 bootable=true-
Check if the VM boots. It should be up and running just fine. Now let’s prepare the VM to save it as a template. We need to make sure the configuration file is “agnostic”, e.g. doesn’t contain any MAC addresses that most probably won’t exist on another system
 We can edit the configuration via CLI or just open the /config/config.boot file in nano and make changes there. If you edit via CLI make sure to issue “save” when you’re done.
 -
While doing that we can also make any other configuration customizations like setting the NTP server etc. Also delete the “console ttyS0” configuration entry to prevent frequent error messages in the console (INIT: Id “T0” respawning too fast…).
-
Power off the VM when you’re confident the config file is clear and prepared. Do not boot the template VM again. Instead right-click it in XenCenter and select “Convert to template”.
That’s it, you can now clone the template and make new VMs. You can also export this template as an XVA file and import it on another XenServer hosts. I’m happy to help if you have any problems or questions ![]()
Best regards,
Docent